搜索到
36
篇与
的结果
-
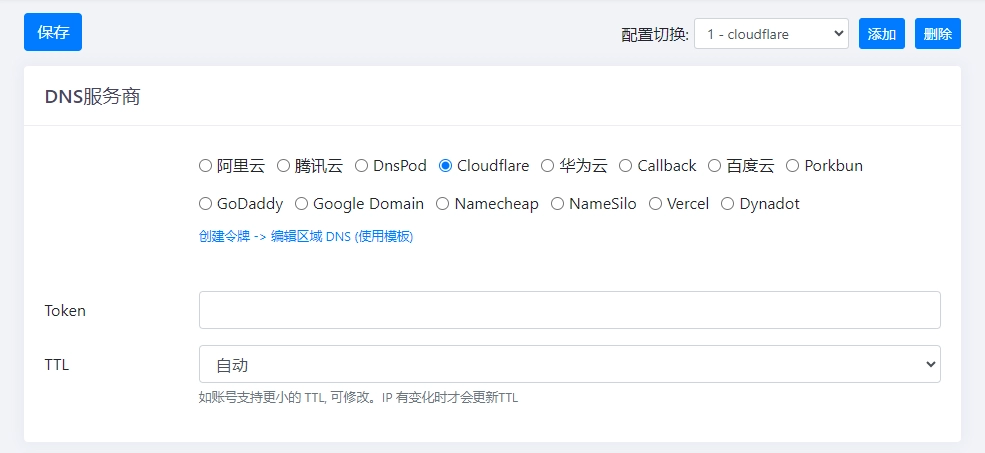
 通过 ddns-go 动态域名解析 实现公网访问内网服务 前言如今 IPv6 的普及度越来越高,与 IPv4 不同的是,大部分人获取到的 IPv6 是公网 IP 并且每一个设备都有一个属于自己的公网 IPv6,因此我们无需再进行内网穿透、端口转发等操作,直接通过设备的公网 IPv6 就可以成功访问到内网服务。但是直接记住这么长 IPv6 的地址来访问显然不现实,我们可以将域名通过 AAAA 解析到我们的 IPv6 地址上,这样访问时,只需要输入域名,DNS 就会帮我们解析到响应的 IP 地址了。即便如此,几天之后你就会发现域名又无法访问了,这是因为运营商分配的 IPv6 地址是动态的,过几天 IPv6 就会变动一次,所以就需要 DDNS 了,它可以定时获取我们当前的 IPv6 地址,并将该地址同步到 DNS 服务商。安装 ddns-goddns-go 是一个使用 Go 语言编写的 DDNS 客户端,支持多种 DNS 服务商,通过 Docker 可以直接安装docker run -d --name ddns-go --restart=always --net=host -v /opt/ddns-go:/root jeessy/ddns-go使用 ddns-go在使用 DDNS 之前,需要确保正常获取到 IPv6,并能正常访问 IPv6,通过 http://[ipv6]:port 的形式,能够访问即可。若访问失败,则需要检查光猫或路由器的 IPv6 防火墙配置是否正确。在浏览器中打开 http://ip:9876 即可进入到 ddns-go 的管理界面,按照以下步骤依次配置:首先,选择对应的 DNS 服务商,本文以 Cloudflare 为例,点击 创建令牌 -> 编辑区域 DNS (使用模板) 跳转到 Cloudflare 创建一个 Token点击 Create Token 创建 Token选择 Edit zone DNS,点击 Use template选择自己需要的域名最后会出现一个 Token,将该值填入到 ddns-go 中即可返回 ddns-go,来到下方的 IPv4 与 IPv6 设置,一般没有公网 IPv4 的可以取消勾选 IPv4,勾选 IPv6,将域名填入下方的 Domains 中,稍等片刻,就可以直接用该域名访问到内网服务了(部分地区 80、443 端口没有开放,需要使用非标端口)
 -
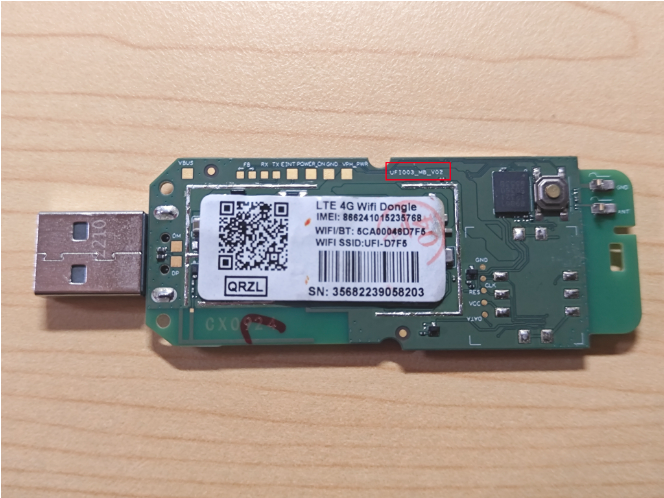
 随身wifi刷debian系统 0. 前言最近我在网上看到一款骁龙 410 SoC 的随身 WiFi,性价比高,领券后十元以下就能买到。更重要的是,这款 SoC 的随身 WiFi 能刷 Debian 系统。你可以在上面搭建网站甚至 MC 服务器,也可以接上扩展版当 Linux 开发板用,可玩性很高。随身 WIFI 的优势就是价格低廉,性能和树莓派 zero2、树莓派 3b 差不多。本文记录一下刷机的步骤和注意事项。1. 硬件配置这款随身 WiFi 配置如下:SoC骁龙 410(MSM8916)四核 Cortex-A53,64 位内存512MB存储4GB版号UFI001C、UFI001B、UFI003、UZ801、SP970不是骁龙 410 SoC 的随身 WiFi 无法刷机,请知悉。2. 所需文件高通 9008 驱动ADB 工具Miko 备份工具Debian 刷机包这些软件可以在下边的百度网盘链接中下载链接:https://pan.baidu.com/s/1xSkiQ8fJo3vx3c0HiDZs8A?pwd=kuvn提取码:kuvn3. 查看板子型号如果不确定下载哪个,请先查看板子型号再下载刷机包。用螺丝刀将随身 WiFi 的外壳拆开,查看板子上方的丝印,型号一般以 UFI、UZ 或 SP 开头。如红框中所示,我买到的型号是 UFI003。4. 安装 9008 驱动执行 driver.exe,并点击立即安装。在弹出如下窗口中,点击“安装”。5. 安装 ADB 工具解压 platform-tools_r34.0.5-windows.zip,并将解压目录添加到环境变量。打开命令提示符,执行 adb version。有如下输出,则表明配置正确。C:\Users\Thinkpad>adb version Android Debug Bridge version 1.0.41 Version 34.0.5-10900879 Installed as D:\platform-tools\adb.exe Running on Windows 10.0.190456. 安装 Miko 备份工具解压 MiKo_Loder Pro.zip,运行 miko.exe 安装备份工具。安装完成后,桌面上会出现 Miko 备份工具的快捷方式。在图标上右键,打开文件所在位置,将解压得到的 Loader.exe 复制到 Miko 安装目录即可。7. 开启 ADB将随身 WiFi 插入电脑 USB 接口。打开设备管理器,如果此时多了一个名叫 Android Composite ADB Interface 的设备,则表明随身 WiFi 已经开启 ADB,无需执行其他操作。如果没有出现这个设备,则需要手动开启 ADB。以 UZ801 型号为例,连上随身 WiFi 的热点,并访问 http://192.168.100.1/usbdebug.html 即可开启 ADB,再次访问即可关闭。8. 备份原厂固件为避免刷错固件变砖等情况,强烈建议备份原厂固件。打开命令提示符,执行 adb reboot edl,此时设备管理器中会多出高通 9008 设备。我们运行上文所提到的 Loader.exe(即 Miko 工具)进行备份数据。此时窗口右侧显示设备信息,表明随身 WiFi 已被成功识别。如果显示 Not Found 字样,请重新安装 9008 驱动并再次尝试。依次点击 Read –>Partition Backup/Erase–>Load Partition Structure。然后双击红色 Option 下面的灰条,选择备份目录,并点击 Read Full Image。再次选择备份目录,并取一个文件名,点击确定,即可开始备份。等待几分钟,直到进度条达到 100%,右侧输出 Sucess 字样和用时,则表明备份完成 。9. 刷入 Debian拔掉随身 WiFi 并重新插入 USB 接口,解压 Debian 刷机包。打开命令提示符,执行 adb reboot bootloader 进入 fastboot 模式。运行刷机包中的 flash.bat 刷入系统,等待刷机完成。输出 all done! 则表明刷机完成。10. 安装 RNDIS 网络驱动刷入完成后,重新插入随身 WiFi,打开设备管理器,若显示 网络设配器->基于远程 NDIS 的 Internet 共享设备 则跳过步骤 2,3;若显示 其他设备->RNDIS/未知设备 则跳过步骤 2;若显示 ADB Interface 则继续操作找到 ADB Interface 将其进行卸载,勾选 尝试删除此设备的驱动程序 ,然后重新插入随身 WiFi找到 其他设备->RNDIS/未知设备,选择 更新驱动程序->浏览我的电脑以查找驱动程序->让我从计算机上的可用驱动程序列表中选取->网络适配器->基于远程 NDIS 的 Internet 共享设备至此,RNDIS 驱动安装成功。11. 连接随身 WiFi 终端驱动安装成功后,电脑上会多出一个名叫 4G_UFI_123456 的 NDIS 设备,同时会出现一个同名的热点,密码为 12345678。Debian 默认用户名为 user,密码为 1,root 密码也为 1。请务必及时修改密码(命令:passwd)。此时可以通过 adb 或 ssh 连接到 Debian 终端。12. 通过 adb 连接将随身 WiFi 插入电脑 USB 接口,使用以下命令查看已连接 adb 设备:adb devicesC:\Users\Thinkpad>adb devices List of devices attached 0123456789 device有新设备出现时,使用以下指令进入 bash:adb shell通过 adb 连接时,使用 nmtui、htop 等需要显示图形的命令,可能会出现如下错误:root@openstick:~# nmtui TERM environment variable needs set.设置 TERM 环境变量即可解决。export TERM=linux13. 通过 ssh 连接将随身 WiFi 插入电脑 USB 接口并连接上随身 WiFi 的热点,使用以下指令进行连接:ssh [email protected]如果连不上说明系统还在启动,请稍后再试。14. 随身 wifi 联网此时随身 WiFi 并没有联网,必须要关闭热点才能连接 WiFi。下面介绍详细步骤。首先打开命令提示符,执行 adb shell 进入 Debian 终端。然后设置 TERM 环境变量:export TERM=linux。执行 nmtui,选择“编辑连接”。左侧使用方向键选择 bridge,右侧选择“编辑”。并回车。删除其中的 wifi,并选择确定。。返回,选择启用连接,则可连接 WiFi。15. 优化系统删除无效软件包仓库rm -rf /etc/apt/sources.list.d/\*删除多余软件包apt autopurge -y adoptopenjdk-8-hotspot更换软件源cat <<EOF> /etc/apt/sources.list deb http://mirrors.ustc.edu.cn/debian/ bullseye main contrib non-free # deb-src http://mirrors.ustc.edu.cn/debian/ bullseye main contrib non-free deb http://mirrors.ustc.edu.cn/debian/ bullseye-updates main contrib non-free # deb-src http://mirrors.ustc.edu.cn/debian/ bullseye-updates main contrib non-free #deb http://mirrors.ustc.edu.cn/debian/ bullseye-backports main contrib non-free # deb-src http://mirrors.ustc.edu.cn/debian/ bullseye-backports main contrib non-free deb http://mirrors.ustc.edu.cn/debian-security/ bullseye-security main contrib non-free # deb-src http://mirrors.ustc.edu.cn/debian-security/ bullseye-security main contrib non-free EOF更新软件包apt update && apt upgrade -y安装常用软件包apt install -y nano curl删除软件包缓存apt clean16. 关闭 LED 灯(可选)随身 WiFi 开机后,LED 灯会不停地闪烁,如果不喜欢的话,执行以下命令即可关闭。echo none > /sys/class/leds/blue:wifi/trigger echo none > /sys/class/leds/red:os/trigger执行后会立即生效。为避免重启后失效,建议设置开机自动执行。编辑 /etc/rc.local 文件,并将以上两行命令添加到 exit 0 之前,并保存。17. 后记感谢 HandsomeHacker 大佬的 OpenStick 开源项目和苏苏小亮亮大佬 的刷机包,能在随身 WiFi 上用上 Linux 系统离不开他们的努力。参考文章https://blog.iamsjy.com/2023/12/11/snapdragon-410-portable-wifi-hotspot-flash-debian-and-optimize/https://zhichao.org/posts/mifi.html
 -

-

-
 二、使用脚本模拟数据 1.这里使用golang写的一个脚本模拟生产上的不同租户ID,不同渠道及不同门店的订单数据在订单服务流转耗时,代码如下:代码结构: C:. │ go.mod │ go.sum │ main.go └─metrics metrics.gometrics.go package metrics import ( "github.com/prometheus/client_golang/prometheus" "strconv" "time" ) var SyncExecuteLatencyTimeBuckets = []float64{0, 1, 2, 3, 4, 5, 6, 7, 8, 9, 10} var orderSyncPosTimeFromAcceptVec = prometheus.NewHistogramVec( prometheus.HistogramOpts{ Name: "order_sync_pos_time_from_accept", Help: "订单在OMS系统的流转时间", Buckets: SyncExecuteLatencyTimeBuckets, }, []string{"partner_id", "channel_id", "store_id", "cost_time"}, ) var orderSyncPosFailTotalVec = prometheus.NewCounterVec( prometheus.CounterOpts{ Name: "order_sync_pos_fail_total", Help: "下发订单至POS请求失败", }, []string{"partner_id", "channel_id", "store_id", "is_time_out"}, ) // TODO: 添加补偿相关的metric, 如补偿次数(hist) func init() { prometheus.MustRegister(orderSyncPosTimeFromAcceptVec) prometheus.MustRegister(orderSyncPosFailTotalVec) } func AddOrderSyncPosTimeFromAccept(partnerId, channelId, storeId string, costTime time.Duration) { orderSyncPosTimeFromAcceptVec.WithLabelValues(partnerId, channelId, storeId, "cost_time").Observe(costTime.Seconds()) } func AddOrderSyncPosFailTotal(partnerId, channelId, storeId string, isTimeOut bool) { orderSyncPosFailTotalVec.WithLabelValues(partnerId, channelId, storeId, strconv.FormatBool(isTimeOut)).Inc() }main.go package main import ( "example.com/m/metrics" "fmt" "gitee.com/yutiandou/wdtools/wdsys" "github.com/prometheus/client_golang/prometheus" "github.com/prometheus/client_golang/prometheus/promhttp" "log" "math/rand" "net/http" "time" ) func IndexHandler(w http.ResponseWriter, r *http.Request) { fmt.Fprintln(w, "hello world") } func main() { http.Handle("/metrics", promhttp.Handler()) http.HandleFunc("/", IndexHandler) //新建一个容器,设置name diskPercent := prometheus.NewGaugeVec(prometheus.GaugeOpts{ Name: "cpu_percent", Help: "cpu use percent", }, []string{"percent"}, ) //将容器注入到prometheus中 prometheus.MustRegister(diskPercent) go func() { log.Fatal(http.ListenAndServe(":1010", nil)) }() for i := 0; i < 5; i++ { go func() { for { rand.Seed(time.Now().Unix()) nowTime := time.Now() time.Sleep(time.Second * time.Duration(rand.Intn(10))) //partnerIdList := []string{"200", "201", "206", "211", "231", "236", "251", "256", "261", "266", "281", "292", "311", "316", "366", "376", "381", "241", "336"} partnerIdList := []string{"200", "201", "206", "211", "231"} //channelIdList := []string{"1001", "1002", "1003", "1004", "1005"} //storeIdList := []string{"2001", "2002", "2003", "2004", "2005"} channelIdList := []string{"1001"} storeIdList := []string{"2001"} partnerId := partnerIdList[rand.Intn(len(partnerIdList))] channelId := channelIdList[rand.Intn(len(channelIdList))] storeId := storeIdList[rand.Intn(len(storeIdList))] metrics.AddOrderSyncPosTimeFromAccept(partnerId, "channel"+channelId, "store"+storeId, time.Since(nowTime)) metrics.AddOrderSyncPosFailTotal(partnerId, "channel"+channelId, "store"+storeId, time.Now().Second()%2 == 0) time.Sleep(3 * time.Second) } }() } for true { //获取cpu使用百分比 percent, _ := wdsys.GetCpuPercent() //设置到容器中 diskPercent.WithLabelValues("usedCPU").Set(percent) fmt.Println("cpu usd percent:", percent) <-time.After(time.Second * 3) } }2.主要是用了这两个文件,操作步骤例如(前提自行安装golang,如yum install golang): cd ~ && mkdir demo03 && cd demo03 go mod init example.com/m vim main.go(将main.go的内容复制进去) mkdir metrics && cd metrics vim metrics.go(将metrics.go的内容复制进去) cd .. go mod tidy go run main.go 3.接第一章,接下来,需要修改prometheus.yml文件,然后docker-compose restart3.1修改prometheus.yml global: scrape_interval: 15s external_labels: monitor: 'codelab-monitor' scrape_configs: - job_name: 'go' scrape_interval: 5s metrics_path: /metrics static_configs: - targets: ['150.158.96.97:1010'] 接下来看第三章
 -
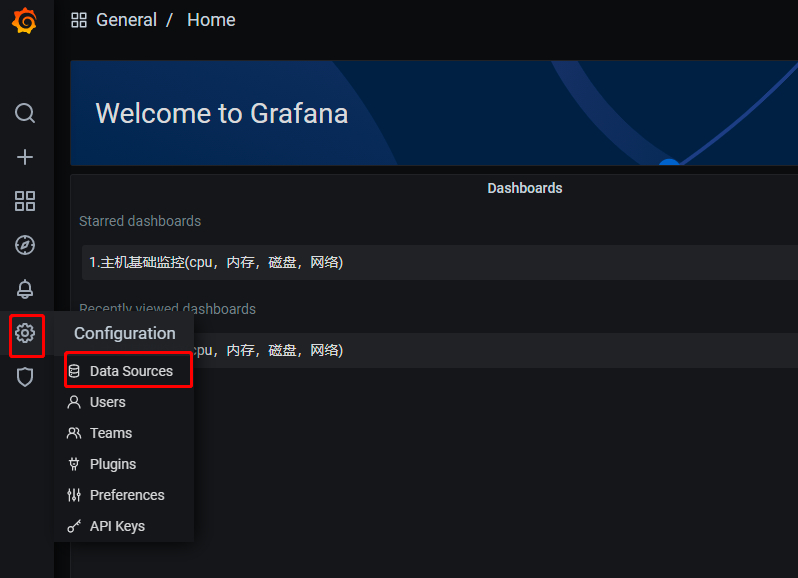
 一、使用docker-compose快速部署Prometheus+grafana环境 由于最近公司服务频繁出问题,老板很生气,下面的人都很不好过,于是老大让加一下业务监控,来观察线上数据状态。但是由于 qa 环境数据量太少,所以自己搭建了一套环境做相关监控,并且写了个脚本模仿生产上的数据,并且做了很多指标,写了一些 Grafana 的 PromQL 语法,网上的资料也很少,我就来补充一下,这个下一章再讲。注意:docker 和 docker-compose 请自行下载安装创建相关目录并给予权限,持久化目录需要给 777 权限,否则容器启动失败cd ~ && mkdir prometheus && chmod 777 prometheus cd prometheus && mkdir grafana_data prometheus_data && chmod 777 grafana_data prometheus_data./docker-compose.ymlversion: "3.7" services: node-exporter: image: prom/node-exporter:latest container_name: "node-exporter0" ports: - "9100:9100" restart: always prometheus: image: prom/prometheus:latest container_name: "prometheus0" restart: always ports: - "9090:9090" volumes: - "./prometheus.yml:/etc/prometheus/prometheus.yml" - "./prometheus_data:/prometheus" grafana: image: grafana/grafana container_name: "grafana0" ports: - "3000:3000" restart: always volumes: - "./grafana_data:/var/lib/grafana"注:prometheus 主机需要部署以上容器,其他被监控主机只需要部署 node-exporterprometheus 配置文件(根据自己的服务器 ip 进行修改 targets 内容)./prometheus.ymlglobal: scrape_interval: 15s # 默认抓取周期 external_labels: monitor: 'codelab-monitor' scrape_configs: - job_name: 'node-exporter' #服务的名称 scrape_interval: 5s metrics_path: /metrics #获取指标的url static_configs: - targets: ['139.224.224.229:9100'] # 这个为监听指定服务服务的ip和port,需要修改为自己的ip,貌似云服务必须用公网ipdocker-compose 启动docker-compose up -d # 挂载目录给权限,不然会启动失败如果启动报如下的"没有权限"错误:grafana0 | You may have issues with file permissions, more information here: http://docs.grafana.org/installation/docker/#migrate-to-v51-or-later grafana0 | mkdir: can't create directory '/var/lib/grafana/plugins': Permission denied grafana0 | GF_PATHS_DATA='/var/lib/grafana' is not writable. grafana0 | You may have issues with file permissions, more information here: http://docs.grafana.org/installation/docker/#migrate-to-v51-or-later grafana0 | mkdir: can't create directory '/var/lib/grafana/plugins': Permission denied grafana0 | GF_PATHS_DATA='/var/lib/grafana' is not writable. grafana0 | You may have issues with file permissions, more information here: http://docs.grafana.org/installation/docker/#migrate-to-v51-or-later grafana0 | mkdir: can't create directory '/var/lib/grafana/plugins': Permission denied grafana0 | GF_PATHS_DATA='/var/lib/grafana' is not writable. grafana0 | You may have issues with file permissions, more information here: http://docs.grafana.org/installation/docker/#migrate-to-v51-or-later grafana0 | mkdir: can't create directory '/var/lib/grafana/plugins': Permission denied grafana0 | GF_PATHS_DATA='/var/lib/grafana' is not writable. grafana0 | You may have issues with file permissions, more information here: http://docs.grafana.org/installation/docker/#migrate-to-v51-or-later grafana0 | mkdir: can't create directory '/var/lib/grafana/plugins': Permission denied则需要将挂载目录赋予权限,即:chmod 777 grafana_data/ prometheus_data/ #个人根据配置文件中具体的挂在目录进行权限修改访问主机的 9090 端口可以查到 Prometheus 监控到的数据,访问 3000 端口是 grafana 的界面账密admin/admin配置监控,点击齿轮,选择 Data Sources点击 Add data source填写 prometheus 地址 ip+端口或者主机名+端口(需要配置 hosts)点击 save&test点击+号,选择 import输入模板号 9276,点击 load。 8919导入模板完成
 -
 使用一键脚本搭建自己的镜像加速仓库 📝 准备工作⚠️ 重要:一台网络畅通的服务器。一个域名,无需国内备案,便宜的就行(推荐 xyz 结尾的,首年最低 7 元)!通过脚本可自动实现 HTTPS。使用脚本前请确认域名的[@记录和*记录]已经解析到该服务器!🚀 快速开始通过项目脚本部署# CentOS yum -y install wget curl # ubuntu apt -y install wget curl bash -c "$(curl -fsSL https://raw.githubusercontent.com/kubesre/docker-registry-mirrors/main/dockerproxy/install/DockerProxy_Install.sh)"🔨 功能一键部署 Docker 镜像代理服务的功能,并且自动配置 https 证书.支持多个镜像仓库的代理,包括 Docker Hub、GitHub Container Registry (ghcr.io)、Quay Container Registry (quay.io)和 Kubernetes Container Registry (k8s.gcr.io)自动检查并安装所需的依赖软件,如 Docker、Nginx 等,并确保系统环境满足运行要求. 自动清理注册表上传目录中的那些不再被任何镜像或清单引用的文件提供了重启服务、更新服务、更新配置和卸载服务的功能,方便用户进行日常管理和维护支持主流 Linux 发行版操作系统,例如 Centos、Ubuntu、Rocky、Debian、Rhel 等 支持主流 ARCH 架构下部署,包括 linux/amd64、linux/arm64✨ 教程前缀替换的 Registry 的参考源站替换为cr.l5d.iol5d.your_domain_namedocker.elastic.coelastic.your_domain_namedocker.iodocker.your_domain_namegcr.iogcr.your_domain_nameghcr.ioghcr.your_domain_namek8s.gcr.iok8s-gcr.your_domain_nameregistry.k8s.iok8s.your_domain_namemcr.microsoft.commcr.your_domain_namenvcr.ionvcr.your_domain_namequay.ioquay.your_domain_nameregistry.jujucharms.comjujucharms.your_domain_name使用方法以 argocd 清单文件为例:wget https://raw.githubusercontent.com/argoproj/argo-cd/stable/manifests/install.yaml首先需要确定原始镜像地址仓库以 argocd yaml 文件举例:grep -n image: install.yaml 21645: image: quay.io/argoproj/argocd:v2.11.0 21739: image: ghcr.io/dexidp/dex:v2.38.0 21768: image: quay.io/argoproj/argocd:v2.11.0 21850: image: quay.io/argoproj/argocd:v2.11.0 21927: image: redis:7.0.14-alpine 22162: image: quay.io/argoproj/argocd:v2.11.0 22214: image: quay.io/argoproj/argocd:v2.11.0 22531: image: quay.io/argoproj/argocd:v2.11.0 22825: image: quay.io/argoproj/argocd:v2.11.0方案一使用方式:使用方式都是替换原来镜像的前缀域名即可实现加速效果,比如:#docker.io 原来地址:redis:7.0.14-alpine # 这个是官方镜像,省略了前边的域名 替换地址:docker.your_domain_name/redis:7.0.14-alpine #quary.io 原来的地址:quay.io/argoproj/argocd:v2.11.0 替换地址:quay.your_domain_name/argoproj/argocd:v2.11.0 #ghcr.io 原来的地址:ghcr.io/dexidp/dex:v2.38.0 替换地址:ghcr.your_domain_name/dexidp/dex:v2.38.0方案二注意事项通过这种方式只能加速 docker hub 的镜像,对于其他镜像仓库,比如 k8s.gcr.io, quay.io 等,需要使用方案一替换前缀的方式进行加速。使用方式:还有一种方案是通过将加速地址写入到 docker 配置文件当中实现加速。Ubuntu14.04、Debian7Wheezy对于使用 upstart 的系统而言,编辑 /etc/default/docker 文件,在其中的 DOCKER_OPTS 中配置加速器地址:DOCKER_OPTS="--registry-mirror=https://docker.your_domain_name"Ubuntu16.04+、Debian8+、CentOS7对于使用 systemd 的系统,请在 /etc/docker/daemon.json 中写入如下内容(如果文件不存在请新建该文件):{ "registry-mirrors": [ "https://docker.your_domain_name" ] }公益镜像仓库由于许多公开镜像站已不再可用,我们建立了一个公益镜像仓库供大家下载使用。然而,由于镜像仓库的带宽有限,建议用户自行搭建。以下是相关资源和使用方法:Github 仓库地址:https://github.com/kubesre/docker-registry-mirrors如果觉得有帮助,请在 GitHub 上点个 ⭐️ 以示鼓励。使用方法k8s.gcr.io/coredns/coredns => kubesre.xyz/k8s.gcr.io/coredns/coredns 或者通过支持的镜像仓库前缀替换即可使用,例如:k8s.gcr.io/coredns/coredns => k8s-gcr.kubesre.xyz/coredns/coredns 总结以上是搭建个人 Docker 镜像站的完整流程。如果有任何疑问或建议,欢迎在评论区留言交流。同时,也欢迎大家分享自己使用的镜像站。最后推荐一个演示的 docker 镜像站:https://github.com/kubesre/docker-registry-mirrors
 -
 docker-compose部署gh-proxy(GitHub加速代理) gh-proxygithub release、archive 以及项目文件的加速项目,支持 clone,有 Cloudflare Workers 无服务器版本以及 Python 版本DemoGitHub 文件加速部署Docker 版本部署的机器必须能够正常连通 GitHub。Docker(Python 版本)docker run -d --name="gh-proxy-py" \ -p 0.0.0.0:81:80 \ --restart=always \ hunsh/gh-proxy-py:latest部署完成 http://你的 ip:81CloudFlare Workers首页:https://workers.cloudflare.com注册,登陆,Start building,取一个子域名,Create a Worker。复制 CF Workers 代码-GitHub 代理到左侧代码框,Save and deploy。如果正常,右侧应显示首页。ASSET_URL 是静态资源的 url(实际上就是现在显示出来的那个输入框单页面)PREFIX 是前缀,默认(根路径情况为"/"),如果自定义路由为 example.com/gh/*,请将 PREFIX 改为 /gh/,注意,少一个杠都会错!使用方法直接在 web 上输入你要加速的 GitHub 链接或者直接在链接前加上 http://你的 ip:81/开源地址hunshcn/gh-proxy github release、archive 以及项目文件的加速项目 Star: 6413 Fork: 1596 Lang: Python Branch: master
 -
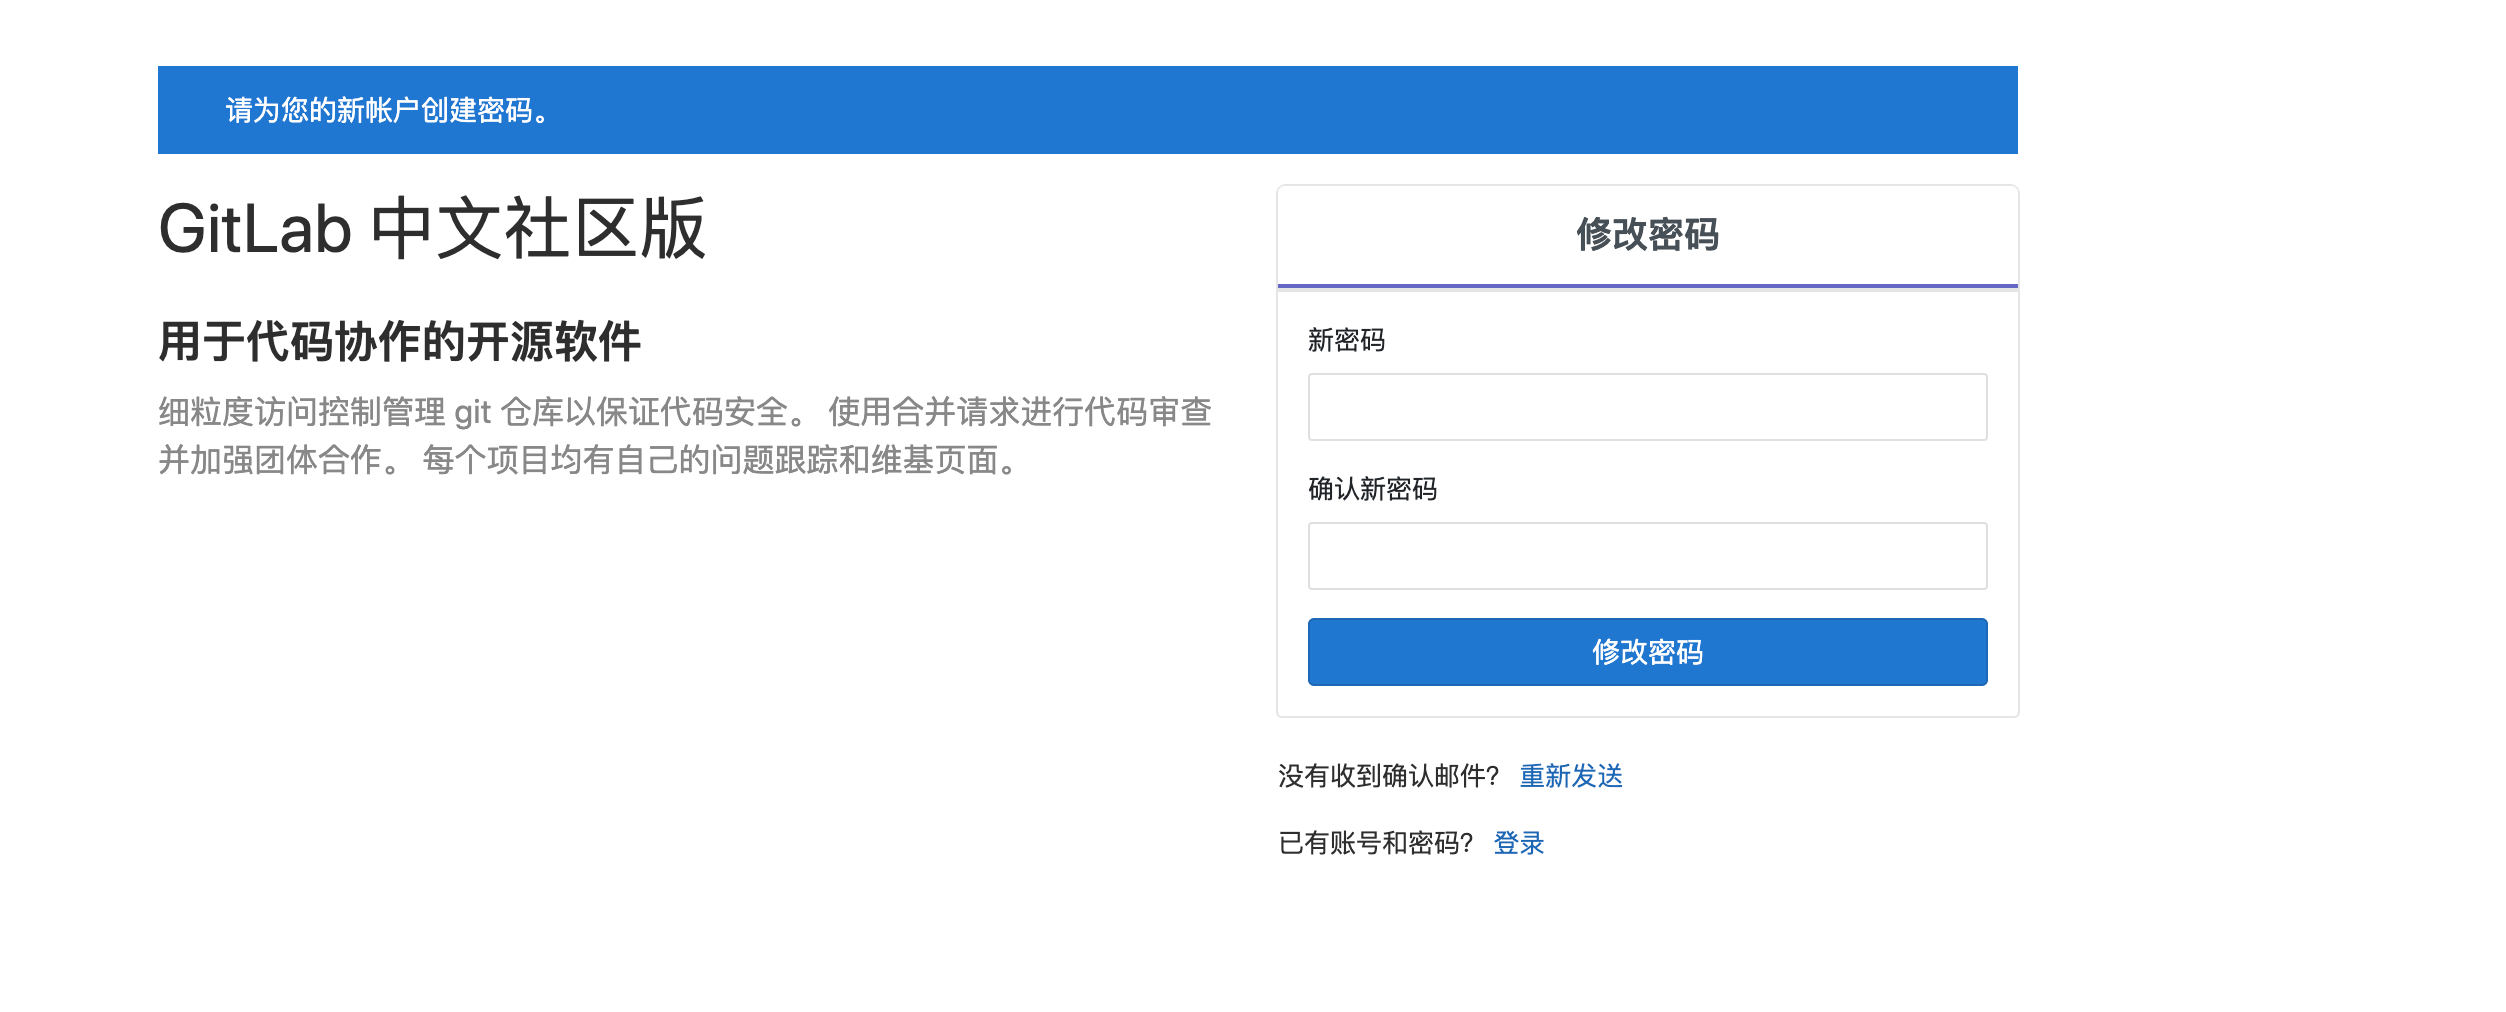
 docker-compose 部署 gitlab 1. 创建文件夹mkdir gitlab && cd gitlab vim docker-compose.yml2. docker-compose.ymlversion: '3' services: gitlab: image: 'twang2218/gitlab-ce-zh' container_name: 'gitlab' restart: always hostname: '192.168.1.180' #部署机器的ip,非容器ip(因为是本地不是线上所以用ip,线上的话可以用域名) environment: TZ: 'Asia/Shanghai' GITLAB_OMNIBUS_CONFIG: | external_url 'http://192.168.1.180' #使用这个地址访问gitlab web ui(因为是本地不是线上所以用ip,线上的话可以用域名) gitlab_rails['gitlab_shell_ssh_port'] = 2222 #ssh clone代码地址 unicorn['port'] = 8888 #gitlab一个内部端口 ports: - '80:80' #web 80 端口 #- '443:443' #web 443 端口,本次未使用就不开放了 - '2222:22' #ssh 检出代码 端口 volumes: - ./etc:/etc/gitlab #Gitlab配置文件目录 - ./data:/var/opt/gitlab #Gitlab数据目录 - ./logs:/var/log/gitlab #Gitlab日志目录3.执行docker-compose up -d这个执行时间可能稍微有点长,不妨你可以去泡一杯 coffee 休息一下~~4.访问 gitlab访问 http://192.168.1.103(即http://"docker-compose中ip/域名")首次设置新密码 : 12345678账号默认是 root
 -
 brew install 安装指定版本软件 工具 - brew install 安装指定版本软件(protobuf 为例)前言在 macOS 下使用 homebrew 安装软件时,默认情况下安装了最新的版本。有时候我们需要老版本的时候,homebrew 并没有提供较为便捷的方式。本文以 protobuf 为例讲解 brew install 如何安装指定版本软件。安装查找 rb 文件地址 ❯ brew info protobuf ==> protobuf: stable 21.5 (bottled), HEAD Protocol buffers (Google's data interchange format) https://github.com/protocolbuffers/protobuf/ /usr/local/Cellar/protobuf/3.17.3_1 (263 files, 19.3MB) \* Poured from bottle on 2022-09-07 at 10:01:17 /usr/local/Cellar/protobuf/21.5 (279 files, 19MB) Poured from bottle on 2022-09-07 at 09:40:56 From: https://github.com/Homebrew/homebrew-core/blob/HEAD/Formula/protobuf.rb License: BSD-3-Clause ==> Dependencies Build: [email protected] ✘, [email protected] ✘ ==> Options --HEAD Install HEAD version ==> Caveats Emacs Lisp files have been installed to: /usr/local/share/emacs/site-lisp/protobuf ==> Analytics install: 191,131 (30 days), 490,097 (90 days), 1,535,759 (365 days) install-on-request: 46,962 (30 days), 111,247 (90 days), 316,495 (365 days) build-error: 157 (30 days 使用 brew info 获取到 protobuf.rb 的地址为 https://github.com/Homebrew/homebrew-core/blob/HEAD/Formula/protobuf.rb查找指定版本 rb 文件浏览器打开 protobuf.rb 的地址,并点击 History。找到指定版本的 commit (这里以 3.19.4 版本为例),并点击 commit 号查看文件。点击 View file 查看文件内容。点击 Raw。保存 rb 文件保存文件,并命名为 protobuf.rb。这里以保存到桌面为例。安装指定版本 protobuf❯ protoc --version libprotoc 3.21.5 ❯ cd ~/Desktop ❯ brew unlink protobuf ❯ brew install ./protobuf.rb ❯ protoc --version libprotoc 3.19.4小结使用 homebrew 安装指定版本的其他软件也是类似的操作,希望能帮助到大家。

